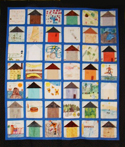
Finishing a quilt: Edges and Labels
Method One: Quick Turning a Quilt
One of the fastest ways to finish the edges of a quilt is to quick turn it. This works especially well if you are going to tie the quilt. You will need the quilt top, a piece of batting larger than the quilt top, a backing fabric larger than the quilt top (this may require seaming together two lengths of fabric, long pins, and a sewing machine.
I recommend making the backing fabric the same fabric or a similar fabric as the outer border, as some of the backing may show along the edges using this method.
- Layer the following items on a large surface (like the floor): The batting, the backing face up, the quilt top face down.
- Pin through all three layers all around the outside edge of the quilt top (which should be slightly smaller than the two items below it. In the middle of one side, leave an opening of about twenty inches.
- Pin through all three layers in several places around the quilt to help keep the three layers together.
- Using a sewing matching and a walking foot if available, sew along all four sides about one quarter inch in from the edge of the quilt top starting at one side of the opening and ending at the other.
- Trim around all four sides so that the backing and batting are even with the edge of the quilt top. All three layers should be sewn together.
- Now comes the magic. Remove the pins you put in the center of the quilt. Lay the quilt back out on the floor and starting at the two corners farthest from your opening, begin to roll up the quilt toward the opening. Roll the nearer two corners as well until the bulk of the quilt is all rolled up near the opening. Flip the package inside out through the opening.
- Unroll the quilt from the new outside. The batting will be sandwiched in between the backing and batting. Pull and tug at the quilt (a friend on the opposite side really helps) until all the layers are lined up with each other. You may want to baste with straight pins or safety pins to keep the layers from moving around.
- Blind stitch the opening closed. You are now ready to tie the quilt.
Method Two: Binding a Quilt
I recommend making your own binding rather than purchasing binding. I am presenting my favorite method of binding. If you already have your own favorite, by all means use it! There are also some excellent books on the subject.
You will need your binding fabric cut into three inch wide strips (this will make a final size of 1/2 inch binding showing on the front and back of the quilt), iron, sewing machine, and hand sewing needles.
- Piece together enough three inch strips until you have a long strip about 12 inches longer than the perimeter of your quilt.
- Fold this strip in half lengthwise, right side out, and iron.
- After your quilt is tied, you may wish to pin or baste the three layers on the edge of the quilt. I do not cut the backing and batting until I have sewn on the binding.
- Beginning at the middle of one side, line up the raw edges of the folded binding with the edge of the quilt top. Starting about five inches from the end of the binding, sew it on with a 1/2 inch seam allowance through all three layers using a sewing machine with a walking foot if possible.
- Stop 1/2 inch from the corner and backstitch. (Figure 1) Fold the binding at a 90 degree angle so that it lines up with the next side of the quilt. (Figure 2) Then fold the binding 180 degrees so that it is ready to sew on the next side. Insert the needle 1/2 inch from the edge of the quilt, backstitch and start the new side. (Figure 3)Repeat at each corner.
- About five inches from where you began, cut the tails so that one nests within the other, turning under the edge so that it is "finished" and continue sewing to your starting point.
- Trim the edges of your backing and batting to meet the quilt top and binding. I use a rotary cutter.
- Turn the folded edge of the binding to the back of the quilt and blind stitch into place. It should just cover the line of machine stitching. As you turn the binding back at each corner, it will form a miter on the front which you should echo on the back side of the quilt
 |
 |
 |
A Word About Labels
The quilts you are creating with students should be well labeled. You don't know where this quilt will be found in years to come, so you will be giving important information to genealogists and quilt historians. This could be in the form of a block on the front of the quilt, a inked label on the backing fabric, or an appliqued label on the back. It should include the date, the place the quilt was made, and the people who made the quilt. This is a chance to be creative, so I like to make a block to put on the front. On our Favorite Places Everywhere quilt, I drew my classroom as my favorite place and made rough sketches of all my students who then signed their name next to their sketch on the block.
© Copyright 1996-2012 Heddi Craft

