Introduction to The CSM Cookbook
You can purchase The CSM Cookbook through Ravelry. The following is the introduction to the book.
This project started out as a way to keep myself organized. I noticed that as I learned more and more ways to make socks on my CSM that I would get confused or over confident and start skipping steps. I made myself some checklists so that I wouldn’t forget all the important steps to making a given type of sock but I kept them open ended so that I could use them over and over again. From those lists came this “cookbook” of recipes that you can use on your sock machine. Think of this as a basic first cookbook – it contains twelve recipes for all of the most common circular sock machine styles with six socks that are “top down” and start with the cuff or hem, and six socks that are “toe up” and start with an extended toe that can be stretched across the cylinder for a seamless design.
There are some things I’m expecting you to know before using these patterns:
- I’m assuming that you know how to set up your machine, adjust the tension, and get started on some waste yarn. I refer to hanging a bonnet, but however you start a sock is fine.
- I’m assuming that your cylinder is marked with half marks to divide the front and the back of the cylinder evenly and that both the front and the back half have target needles marked for making heels and toes.
- I’m assuming that you know how to do things like engage your heel spring and crank in both directions for heels and toes.
- Since rehanging heel forks or v-hooks while making a heel or toe depends on your particular set up, there aren’t directions for when to do this. Just move your weights when needed.
- Finally, I’m assuming that you have learned how to clean your machine, time your ribber, and adjust your yarn carriage.
If you need help with any of those things, I’ve included some of the best online instructions and videos in the back of this book in the Resources section. Once you have those basic skills, these checklists will help you put them together to make beautiful socks.
Once I started working on these patterns, I realized that there were other things a new cranker (that’s a person who uses a hand crank sock machine) might like to have, like directions for making gauge swatches or a worksheet to easily determine the rounds needed for a given person’s foot or illustrations for techniques I mentioned in the patterns. Suddenly, I had a whole book, not just patterns!
I was introduced to circular sock machines as a hand knitter and knitwear designer, so you will see that I use hand knitting terms within this book. Many of my hand knitting skills transferred easily to working with the sock machine, so I used those conventions as I wrote. The patterns are written in an open ended format so that you can customize the pattern to make the type of sock you want in that style. Every pattern can be used to make anything from an ankle sock to a knee sock and from the most petite foot length to an extra long foot, just fill in the blanks to adjust the leg and foot as needed.
As in hand knitting, there are many ways to accomplish a particular result on a sock machine. I’ve illustrated the methods that work well for me, but please explore other methods and find the ones that are right for you.
One final comment: Part of the process of learning to use a sock machine is making mistakes. These checklist style patterns will help keep you from making mistakes in completing all the steps of the process, but you’ll still have plenty of dropped stitches and other mistakes. The video channels listed in the Resource section show many examples of how to recover from mistakes. When something goes wrong, I usually try to estimate how long it will take me to repair the mistake compared to just scrapping the sock and starting over. My advice is to take on a learner’s mindset. Go slow at first, try new methods now and then, and enjoy the process of figuring things out!
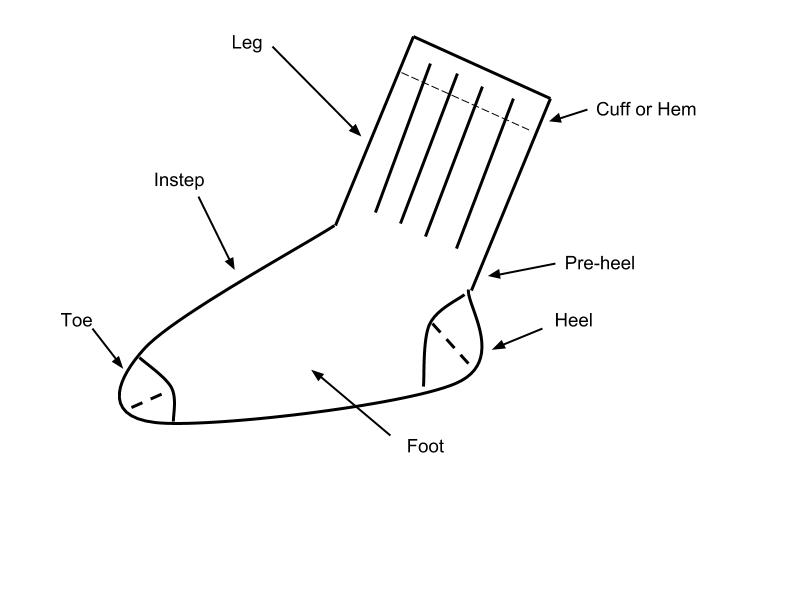
Anatomy of a Sock
Included in this book you will find six different socks that start at the cuff or top hem and six that start at the toe. Each recipe takes you through all the steps of making a particular type of sock. Below is a diagram of the basic parts of a sock, whether you work the sock from the top down to the toe or from the toe up to the top.
There are a few distinctions between parts depending on the type of sock. The very top of the sock is referred to as the cuff when it is ribbed and as a Hung Hem if the edge is folded over and secured on the inside of the sock. A pre-heel is a part of the sock that is worked in smooth stockinette for the back of the heel so that the sock fits better and is more comfortable inside a shoe. If the sock doesn’t have ribbing or mock ribbing on the leg, there will not be a pre-heel.