Experimenting with Cloth Mask Patterns
Note: I’m continuing to add to this post as I make more masks and learn more about how to make them effectively.
As I write this, my family is starting week 2 of sheltering in place here in northern California due to the outbreak of Covid-19. The internet is awash with patterns for cloth masks and many hospitals and medical centers are making formal requests for masks. I thought I’d share some of the information I’ve learned and tell you about the three masks I’ve tried.
First, many health care facilities have specific requests for what they want, so it’s probably best to check before you start making masks. Some are requesting specific designs, others have lists of specific fabrics they want used, and others will ask you specifically to use/not use elastic.
In addition, find out how your recipient plans to use the cloth masks. Some facilities are planning to use cloth masks only in low risk areas to save medical masks for high risk areas and others are hoping to use the cloth masks over medical masks to extend the use of the medical masks. Each of these situations requires different solutions. If you don’t have any other information, at least try to find out what their usage scenario is going to be. UC Berkeley School of Public Health is compiling a reliable list of locations that have requested masks.
There is varying information about the effectiveness of cloth masks (see here and here and here and here and here and here and here)and I’ve also found one study on the effectiveness of different materials in cloth masks. (Update 4-3-2020: This study from Yale strongly advocates that we all wear cloth masks.) (Update 4-5-2020: The CDC now recommends cloth face coverings for all citizens.) The bottom line is that cloth masks are not as effective as medical grade masks but if they are properly worn, removed, and washed, they are better than no mask at all.
I tried out three different patterns and then tried them on my face and my husband’s face to assess fit. I used different materials as liners and asked for feedback from my husband on comfort. I used cloth ties for all the patterns as some of the information I found said that the heat used for cleaning may degrade elastic quickly. (However, if you are making masks for the elderly or anyone with coordination issues, elastic might be easier to manipulate.) I washed all the fabrics in hot water and dried them on high heat so that they were preshrunk and I ironed everything before cutting.
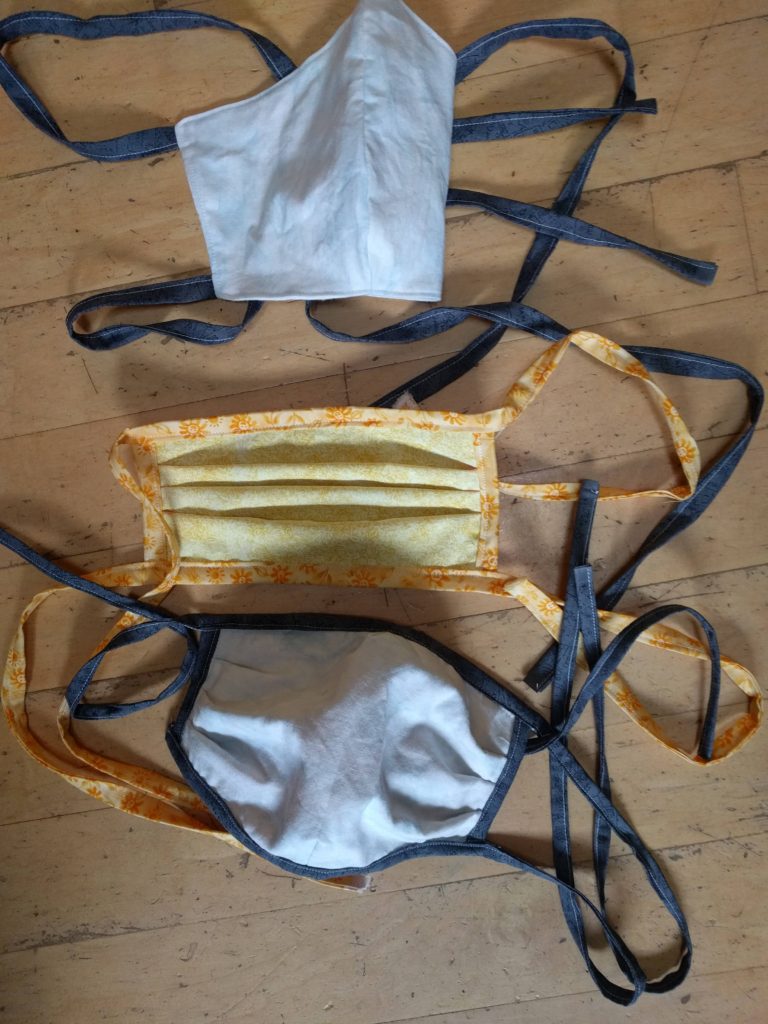
The first pattern was called A. B. Mask – for a Nurse by a Nurse and this was, in my opinion, the best pattern of the three I tried. It had the best fit of the three and worked equally well on my husband and myself. It has both shaping darts and pleats. For this pattern I use a woven cotton fabric for the outside and the ties and a dense t-shirt fabric for the lining. The only change I made to the pattern was that I sewed the top and bottom dart first so that I could enclose them inside the layers before making the pleats. The t-shirt fabric was a little harder to breathe through due to its thickness, but according the the effectiveness information above, as a cotton blend, it would be about 70% effective against a virus. In my opinion, this would be the best mask to use over a medical grade mask (which it was designed for) and has the best fit as a replacement mask. This one took the longest to make but I think the results are superior. (A video tutorial for making this mask is available here.)
The second pattern I used was this Facemask pattern, which is a rectangular style mask with pleats. I added two long strips of fabric across the top and the bottom of the mask for ties instead of using elastic, in the manner described in the A. B. Mask, above. This one was made entirely of quilting cotton. It was fairly well fitting for both myself and my husband although it gapped just a little at the sides and the bottom. This was the second easiest mask to make and it went quickly. With just two layers of woven cotton, it was very breathable. This would be my second choice of patterns and would be best as a replacement for low risk situations as it might not completely cover a medical grade mask.
The third pattern was the Fu Face Mask which I tried because this style was specifically asked for on one of the medical sites I looked at. This is the style that has shaping across a center front seam but no pleats. I picked this particular pattern because it used cloth ties instead of elastic. On this one I used woven cotton for the outer layer and flannel for the inside layer. This design was the least well fitting of the three I tried but the easiest to make. I think if you were making masks only for yourself, this style could be adjusted for a particular face and made to fit well, but if you are making masks to donate, I don’t think it’s the ideal solution. The flannel as a lining was soft and didn’t bother me, but my husband felt it was wicking moisture quickly and found it uncomfortable. This pattern might be good for covering a medical grade mask, but I don’t feel the design is the best unless you can customize it to fit. (ETA 4-05-2020: I’ve tried a couple of other patterns for this style of mask and I think the ones that have a curve at the bottom of the mask provide a better fit. This one from the University of Utah is cut on the bias and I think that also helps to give it a better fit although it wastes more fabric.)
There are numerous sites popping up on Facebook to help those looking to make masks and distribute them. You can find some of them here and here and here and here and I’m sure there are more to come. I’d especially recommend looking for a group local to your area to make sure masks are distributed where they are needed. I hope you find this information useful and feel free to contact me with any questions.
Responses to questions and comments:
What about adding wire to the nose area? Some of the patterns (like this one) use wire or aluminum to make the nose area of the mask more adjustable. I’m concerned about using folded wire/pipe cleaners/twist ties, because I think in an industrial washing situation, the ends of the wire could work their way out of a mask. My husband and I discussed the aluminum solution, and I think curving the ends of an aluminum strip and sanding them would be the most sturdy and safe for washing and aluminum would not rust. We both wear glasses and we noted that they helped close the gap around the nose on all the mask styles.
A good solution I’ve seen is to add a piece of ribbon to the nose area where the wire can go and can be removed for washing.
What about using interfacing for a layer? I’ve read some comments that I couldn’t verify that the interfacing we use for sewing is a “melt blown fabric” like that used in medical grade masks. I couldn’t find any research as to how protective the interfacing actually was, so I chose not to use it without more information. My experience with using interfacing is that it tends to soften and thin after washing, so I’m not sure how that would affect its protective qualities after washing.
The same goes for shop towels. Although many have reported that they have better filtration than quilter’s cotton, they degrade after a few washings.
What about adding pockets for filter inserts? If the nurse or medical facility you are making masks for has access to filter inserts, I think this is a great idea. I didn’t have any to experiment with, so I didn’t try a pattern with a pocket. There are three ways you could add an opening pattern you like to a to insert a filter. One would be to finish the edges of both layers of the side or top of a two layer mask with folded fabric strips before enclosing the other edges. The second would be to add extra fabric to your pattern so you can fold and seam the edge before adding layers. This pattern shows an example of how to do that. The third method would require your lining fabric to be something like a t-shirt knit that does not fray, then you could simply sew a center seam to the inner lining and leave an opening, like the first example here.
What about using strips of t-shirt fabric for ties? Seems to work well, but if you are using them in a design with a channel, consider sewing a seam across the channel so they don’t come out during washing.
What if I need to make a lot of masks fast? Our area mask making group is getting requests for lots of masks! If you have access to elastic, the Deaconess pattern is probably one of the fastest to make. There is also a version on the website with ties that would be a second choice. To speed up the process, consider making a pleating jig like this one or this one. Rather than make one mask at a time, do each step assembly line style, making 5-10 masks at once and doing all of the first step, all of the second step, etc. You can “chain” your masks at the sewing machine and not cut the thread between each mask as you complete each step.
A mask with the shaping across the center seam and channels for elastic or ties like this one or this one would be a little slower to cut out but also fast to sew. For these patterns, you could use fabric ties from t-shirts as illustrated in this pattern (which is also a quick pattern).