Gauge on a CSM
A while back, I really got into using the ribber on my CSM and I looked at all the factors that affected how the ribber worked. One thing I did was reduce the amount of weight I was using on my socks and suddenly my socks were coming out in unexpected sizes. It got me thinking about all the factors that affect gauge when making a sock. Gauge included both stitch gauge and row/round gauge. Stitch gauge determines how big around the sock is and is usually measured in stitches per inch/cm. Row gauge (sometimes identified as round gauge) determines how long the sock will be and is usually measure in the number of rounds per inch/cm. Although there are various charts on the internet that claim to list the number of stitches and rows you will need to make a give sized sock on a given cylinder, the only way to really know your gauge is to do a swatch yourself and measure.
Here are all the thing that will affect your gauge:
Cylinder size: All the cylinders for a given sock machine are the same diameter and circumference (different brands of machines will have different diameter cylinders). The difference is in how far apart the slots are cut for the needles. Fewer needles mean the needles are spaced farther apart. More needles will mean they are spaced closer together. The yarn will run a shorter distance from needle to needle when the needles are closer together and a longer distance when they are further apart creating smaller or larger stitches respectively.
Number of needles used in the cylinder: For mock rib or for patterns worked every other needle, removing needles creates short strands of yarn in the space where the needle is missing. These aren’t as long as the path going around a needle, but they are longer than the usual path between side by side needles. Removing needles for mock rib or other patterns will tend to tighten the stitch gauge but may lengthen the row/round gauge.
Tension as set on the cam nut: The position of the cam nut determines how far down the needle pulls the yarn as it creates a stitch and makes the stitches “tighter” or “looser,” affecting both stitch and row/round gauge. The cam nut is the main thing we usually think about when adjusting gauge, but it works in tandem with all the other factors listed here.
Using the ribber: Knit and purl stitches tend to draw in when combined, giving a tighter stitch gauge when measured in a relaxed state. Ribbing does stretch, though, and a stretched ribbed fabric will have the same gauge as a plain knit fabric if all the conditions of making it are otherwise the same.
Amount of weight hanging on the sock: The amount of weight hanging on the sock will affect how large stitches become. Less weight means less pull and less yarn in each stitch. More weight means more yarn can be pulled into each stitch.
Heel spring use: The heel spring puts drag on the yarn, meaning that less yarn can get to each stitch because it’s being pulled taut. That means both stitch and row gauge are generally tighter with the heel spring on.
Yarn used: All fingering weight yarns are not exactly the same. They will be of slightly different diameters which can fill the space between stitches and affect both stitch and row gauge. The amount of nylon in the yarn, the twist or springiness of the yarn, and if you add a thread of lycra to the yarn will all affect the size of the stitches. In addition, different colors of the same yarn may produce slightly different gauges because the dye in the yarn takes up space and can make one color “plumper” than another.
Method for winding yarn: Yarn coming off a ball will have slightly more tension on it than yarn coming off a cone. Whatever method you use to prepare your yarn will add or subtract tension, changing your gauge.
Special patterning: Cables, Fair Isle patterning, and slipped stitches will all change the gauge of a sock. Cables tend to affect stitch gauge more and slipped stitches will change row gauge more.
Resting and washing: The gauge you measure when a sock is fresh off the machine will not be the same as the gauge after the same sock has rested and been washed. When the yarn has been under tension, it is much more stretched. In addition, some yarns will “bloom” after being washed, which also affects gauge. For a true gauge check, the sock should at the very least rest until it has relaxed to it’s “normal” state and should usually be washed to determine how washing changes the yarn.
Knit fabric is stretchy, so there is some range in which a sock will fit comfortably. For consistent results in gauge and sock width and length, all the above conditions should be the same from one sock to the next.
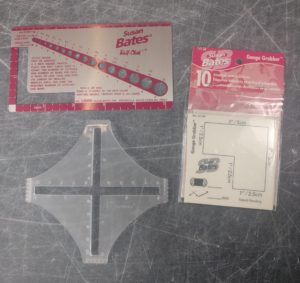 My good ol’ Susan Bates ruler: Gauge rulers like this come in many variations, but the all involve an L-shaped hole in some kind of rigid material. Lay it over your swatch, line up the L to a horizontal and vertical line of stitches and count away. Double the number you get to find your gauge over 4″ (10 cm).