Reading Japanese Knitting Patterns

Reading Japanese Knitting Patterns

After getting the really great Japanese Knitting Patterns book, I’ve decided I wanted to explore some other Japanese pattern books.  I signed up for a class at Stitches West in February but that’s a long way off!

So first I visited Kinokuniya, the Japanese bookstore in San Jose.  I’ve browsed Japanese knitting books there in the past, but perhaps because it is summer, they didn’t have much of a selection this time.  Then I remembered that I had heard about an Etsy shop that carries all kinds of Japanese craft books and magazines.  I searched through literally hundreds of books and magazines and narrowed it down to six that I ordered.

The books and magazines have arrived and now I’m puzzling through the construction details for a few favorite patterns.  I thought I’d share the resources that I’ve been using to help me.

In addition to the front material in Japanese Knitting Patterns, Twig and Horn have a great post on how to read Japanese knitting patterns.  One of the most important things it explains is how to read the decrease information for armholes and necklines.

I also found a Japanese/English dictionary full of knit specific terms that has been useful.

Ravelry has a Japanese Knitting and Crochet group that is also very helpful.

If you have used Japanese knitting patterns, I’d love to hear your favorite resources!

On and Off the Needles in August

On and Off the Needles in August

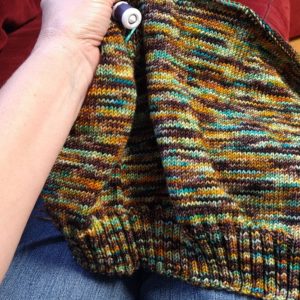
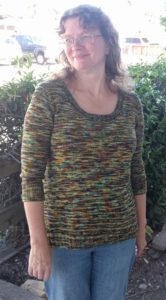
It feels like I had a slow knitting month but I finished one major project.  My On a Whim CustomFit pullover is finished!  I modified the pattern slightly to have longer ribbing at the cuffs and hem.  It’s way to warm for this sweater right now, but I look forward to wearing it this winter.

I started two new sweaters.  Spanish Bay is another CustomFit sweater.  I worked the ribbing by hand and did the stockinette portions on my LK-150 flatbed knitting machine.  The pieces are assembled and I’m adding the lace border now.  I’m doing a fun trick for the lace.  The first three odd rows are yo, k2tog and the next three odd rows are ssk, yo.  It’s over 200 stitches so that over 100 ssks to work.  On the even (wrong side row) before the first yo, ssk row, I wrapped my yarn for the purls in the opposite direction.  That changed my stitch mount so that all the stitches are “pre-slipped” on the right side so I just have to work them through the back loops.  It was a bit of a trick to purl the “wrong” way for my usual knitting style, but it’s making things go much quicker on the right side rows.

My second sweater is a poncho/cardigan combo from Japanese Knitting (Pattern F).  The yarn I’m using for this is Knit Picks Swish DK, which I think should be called “Squish” because it is sooo soft and squishy.  I’m just getting started on this and it is my new endless stockinette pattern for social knitting.

I played a bit with working a lace pattern on my CSM and made a little cozy for a mason jar.  I have to play with this a bit more and see if this would be a good use for leftover yarn from making socks.

In knitting I can’t show yet, I spent quite a bit of time working on swatches and samples for third party submissions.  More info on that if/when they are accepted!

My Fidget Socks continue to move along.  I’m ready for the heel in the second sock.  No progress on the Star Wars Double Knit Scarf, but I will get back to it soon!  I knit a few rounds on my Rose City Rollers while at a doctor’s appointment.

I have a new pattern out called the Seetang Cowl.  I didn’t knit on it this month, but my lovely test knitters made all kinds of beautiful variations you can check out!

New Pattern Release: Seetang Cowl

New Pattern Release: Seetang Cowl

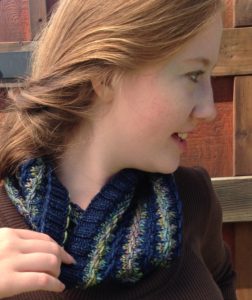
I’m so excited to announce a new pattern release!  The Seetang Cowl is a cozy and richly-textured cowl that uses a semi-solid and variegated yarn to create undulating textured stripes in a slipped stitch pattern.  Only one yarn is used per round in this rhythmic, easy-to-knit pattern and both written and charted instructions are provided.

I loved seeing all the variations my test knitters created!  They will be adding their projects over the next few days so you can see everything from subtle to bold color variations for this pattern!  Most test knitters completed this project in just a couple of days, so you know it will make a great last minute gift.

If you are a blog reader, please use the code SUMMER in Ravelry to receive 20% off this pattern through the end of July 2018.

I look forward to seeing your finished cowls!

Teaching Tips: Recommending the Next Project

Teaching Tips: Recommending the Next Project

When you teach a knitting class, students often ask what pattern they should work on next.  Your answer should depend on the student’s goals.

If the student wants to practice the skills they have learned in the class they just finished, then suggest a pattern that has mostly or completely the same skills.  Prior to teaching a class, check the shop samples for patterns with similar skills you can recommend and/or make a short list of patterns from Ravelry that you can suggest.

If the student is working to increase skills with each project, then you should suggest a pattern with one or two new techniques.  That way the student can both practice the previous skills (important for retention) and try something new!  Again, look at shop samples for possibilities and also your shop’s class list for appropriate next step classes.  If you are using my Teacher Packs, the lessons can be taught in the order they are presented for a smooth progression of added skills.  Make sure students know where they can get help if they are working independently.

Of course, there will always be the knitter who after taking one or two classes, jumps in with both needles into a complex knitting pattern.  The best way to support these students is to help them step by step through each section of the pattern.  Don’t discourage them, we all learn differently, but give them the resources they need if they get stuck.  Think of these students as the type who loved taking four week summer courses that covered a semester’s work in college rather than pace it out over 16 weeks of a normal term.  These students will benefit from private lessons or from drop in troubleshooting classes.

Counting Your Stitches

Counting Your Stitches

There are a lot of tools out there for counting your stitches on a gauge swatch.  Here are three that I like and use regularly.

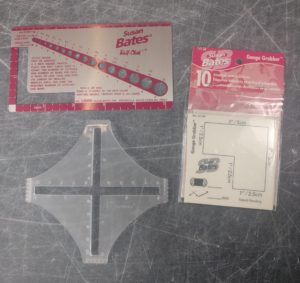
My good ol’ Susan Bates ruler:  Gauge rulers like this come in many variations, but the all involve an L-shaped hole in some kind of rigid material.  Lay it over your swatch, line up the L to a horizontal and vertical line of stitches and count away. Double the number you get to find your gauge over 4″ (10 cm).

The Gauge Grabber: These are designed to be one time use and may even be intended to keep on your swatch permanently, but I tend to use them several times until the sticky stops sticking.  What I like about these is that it’s a bit easier to count partial stitches than the opaque tools like my Susan Bates ruler above, because you can see the partial stitch on either side of the dividing line, making it easier to tell if that partial stitch is a 1/2 stitch or closer to a 1/4 stitch.  I also like that once they are stuck to the swatch, the stitches underneath don’t shift or move about, so they help keep me honest and make it harder to just give that little tug to make the gauge work out.

The Akerworks Swatch Gauge:  To use this ruler, you need to have a good sized swatch– ideally about 6″ (15 cm) square, really.  Gripping feet on four sides of the ruler keep your swatch from moving while you count.  And the semi-translucent plastic helps you judge the actual size of those partial stitches.  It has the widest counting space of the tools I’ve talked about, and the more inches you count, the more accurate your numbers will be.  4″ (10 cm) is the standard used in most patterns, so you can make a direct comparison to what’s written in your pattern.

No matter what ruler I use, I often count my stitches in several places on the swatch, just to see if there is any variation (and if there is, I go with the average).  On smaller projects, or ones where I’m familiar with the yarn, or ones where gauge won’t make a difference in wearability, I might just cast on and check gauge as I go because it’s not much work to frog a small project and a shawl that’s an inch or two larger or smaller won’t bother me.  If I’m making something where fit counts, it’s a new yarn, and/or it has more than a skein of yarn involved, I make a good sized gauge swatch worked flat or in the round as the pattern will be worked and I play with needle sizes till I get what I want.

On the Needles in July

On the Needles in July

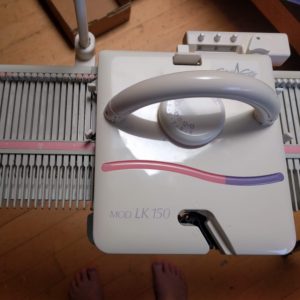
In June I got a new set of needles– 150 to be exact– in the form of an LK-150 mid gauge knitting machine.  About 17 years ago I acquired a 1960’s era standard gauge Brother knitting machine in a silent auction where I was the only bidder.  I played around with it for a bit and made the parts to a drop shoulder baby sweater that was only recently completed.  I’ve become a big fan of Amy Herzog’s Custom Fit program and recently stumbled across a post from someone doing a lot of the work on a knitting machine and finishing by hand.  It seemed like a brilliant way to work through a lot of stockinette in a short amount of time.  Just by chance, someone was selling an LK-150 in my area on Craigslist.  It’s a much newer machine that can work with yarns from fingering to worsted.  (The Brother is best for yarns lace to fingering.)  I completed two projects on it in June:


First, I finished my Featherweight Cardigan.  Although it’s laceweight yarn, it was started on US 6 needles, so it worked best with the LK-150.  It took me about five days to complete with the help of the knitting machine.  I made and washed a swatch to match my hand knit gauge, hung and finished the back I’d been working on, knit the ribbing for the fronts and sleeves by hand, then hung and knit them up.  The final two days of the five were spent knitting the wide ribbed collar and buttonbands.  I am very pleased with the results and am now able to wear this lightweight sweater as a morning layer.

Second, I played with a variety of methods for working Fair Isle on the LK-150 using this resource.  I used the Christmas Stocking pattern from Faye Kennington and re-engineered it a bit to be made top down on the knitting machine with a hand knit heel and toe.  That little stocking took me five days as well as I had to frog a lot of mistakes (the birds got knit upside down the first time, for instance).  But by the end, I felt pretty confident I could work Fair Isle on the machine.

My hand knitting has been making a lot of progress despite my distraction with my new toy!

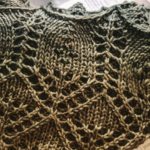
My yarn arrived and I finished my new shawl design.  My hat is off to Anzula for their quality control on their colorways.  I was prepared to blend in the new skein as it would be from a different dye lot, but the match was so good, I didn’t actually need to do that.  Here’s a sneak peek.  It will be up for test knitting soon
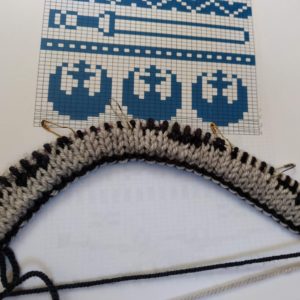
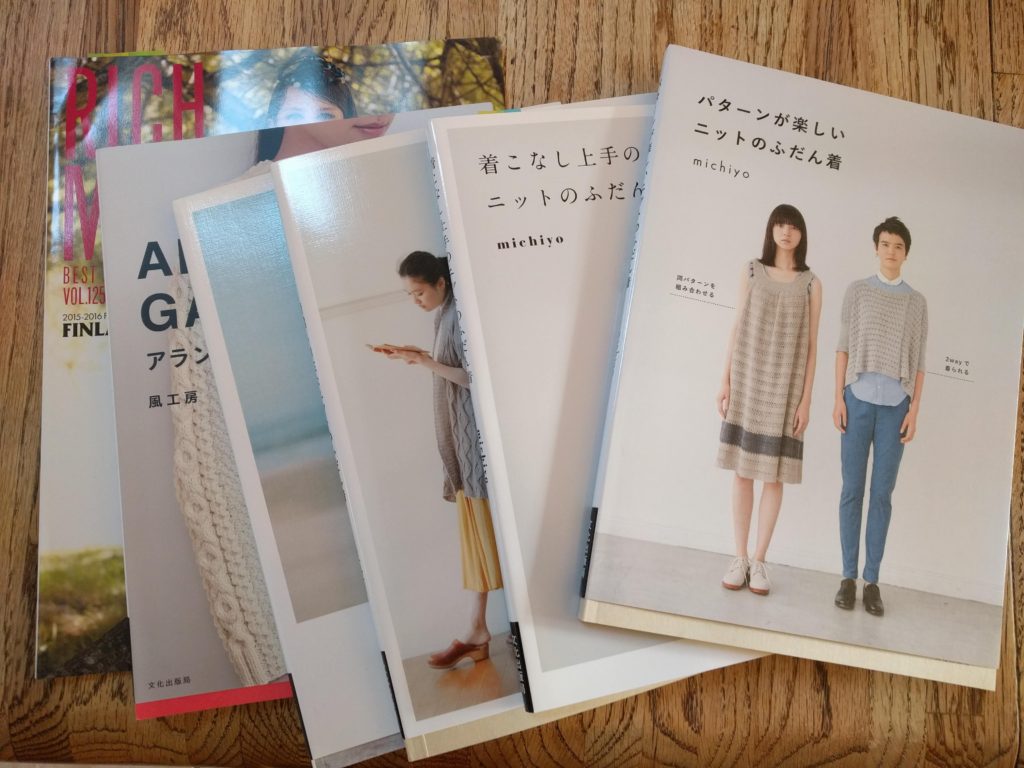
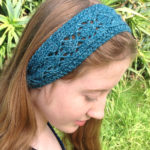
 in my Ravelry GroupSign up to be a test knitter if you’d like to hear about this opportunity.

I also made a lot of progress on my On a Whim pullover.  I’ll continue to work it by hand.  I’ve finished the body of the sweater and am working the sleeve cap decreases on the first sleeve.  One sleeve to go and it will be ready to sew together!

My first Fidget sock is complete and the toe is started on the second sock.

I also started a new knit along project with my friend in Kansas.  We are making the Star Wars Double Knit Scarf.  This one requires a lot of concentration.  I think it will be on the needles for a while.

Finally, I spent a lot of time swatching for some possible third party submissions.  I love swatching, to tell the truth.  My swatches are fairly large but much smaller than a garment and I love having that canvas to explore ideas.

The Personal Side of Knitting

The Personal Side of Knitting


Today I wanted to post a bit about my personal life and how knitting has fit into it.  I’m currently at the age where my body is changing from motherhood to crone-hood– in other words, I’m going through menopause.  A stereotypical view of menopause (or perimenopause as it’s more correctly called) is that it’s a time where women get hot flashes, have irregular periods, and suffer from empty nest syndrome.  Although these things are true (except the empty nest– many of us started our families later and I still have three teens at home), there are some symptoms that we fail to hear about in the popular media that are much more challenging than hot flashes.  Things like depression.  Memory loss.  Brain fog.  For a Type A person like me, who prides herself on getting things done and lots of them, these things are much more daunting than having to throw the covers off several times a night.

For the last year or two, I’ve solved this problem by taking a lot of estrogen to replace what my body isn’t making.  I kept asking my doctor to up the dose until I felt like myself again.  At the same time, I started using more checklists, more reminders, more alarms, more routines, and more notes to myself to remind myself of what I might forget later.  Now, as I approach the age where I have to balance my risk of heart attack or stroke with my day to day health, I’m weaning off the estrogen again.  And I’m having “flat” days, days where I don’t feel particularly… well, I don’t feel much of anything.  I have trouble making a plan for the day sometimes.  I have trouble following through to the next step.

This is where knitting comes in.  I have several bags or baskets of knitting around the house.  A sock by my bed.  A stockinette sweater by the front door.  A garter blanket by the couch.  I’ve made myself detailed step by step lists of how to make several kinds of sock on my sock machine.  So even when I’m feeling flat and unable to face even sorting and folding laundry, I can pick up a knitting project and make a few rows or rounds.  These projects grow, even when I’m feeling stagnant.  The softness of the yarn and the feel of the needles soothes me and awakens my spirit at least a tiny bit.  It helps me keep a wee chink of light open against the gray.

Knitting has also kept me connected to other women of all ages.  It was my knitting group who encouraged me to go to the doctor to get that added estrogen in the first place.  My knitting group has sympathized and empathized and reassured me that this is not me alone.  Their constancy, their wisdom, and their kindness have helped to keep me afloat as I’ve navigated this challenging time in my life.

I wanted to write about this because the mood and memory effects of menopause aren’t commonly talked about, and I think many of us struggle alone.  As I’ve been working through this process, I’ve realized that as uncomfortable as it is, I need to talk about it.  Getting through will be worth more if I can know that I helped someone know they aren’t the only one.  My knitting helped me discover that.


Teaching Tips: Building in Practice

Teaching Tips: Building in Practice

Some of my Teaching Packs build in practice before students begin the actual project.  For instance, in the Learn to Knit Lace pack, the teacher notes instruct the teacher to have students cast on a swatch and practice the yarn over and the different types of decreases in a swatch before they cast on the actual headband pattern.

Why build in practice on a swatch first?  Well, in this case, making left-leaning and double decreases requires some stitch manipulation that will be new to many students.  By starting with a swatch, students only have to worry about one thing– making the stitch properly.  They don’t have to worry about following the chart or written directions.  They don’t have to worry about getting the right tension.  They only have to worry about manipulating the stitches correctly.

When possible, teachers should look for ways to build in practice on new skills in isolation before applying them to a more complicated project.  When it’s not possible, remind students that it’s just knitting, and if something doesn’t work, we can always pull out the yarn and start again.

New Japanese Knitting Book

New Japanese Knitting Book

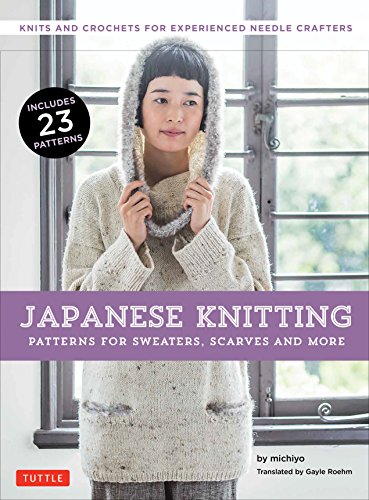
 I recently purchased the book Japanese Knitting: Patterns for Sweaters, Scarves and More that has been translated into English and published by Tuttle Publishing.  They also recently published the Japanese Knitting Stitch Bible, also a translation.

I have a number of Japanese stitch dictionaries but have shied away from the pattern books in Japanese, feeling concerned that there is too much I’d have to puzzle out.  This book is translated to English from the original Japanese but it keeps the format and style of the original patterns, which are much more brief than modern American patterns.  It also includes a special five page introduction to Japanese knitting patterns for English readers that explains how the patterns are traditionally laid out.  I think those five pages were worth the cost of the book because they have given me more confidence to look at the Japanese language pattern books again next time I am at a Japanese bookstore.

My favorite pattern in the whole book is F Poncho and Cardigan, a garment that can be worn both as a poncho style garment with sleeves or as a circle style cardigan.  It’s one of several two way garments that caught my imagination both as a knitter and as a designer.  I have yarn on the way and hope to start working on this one soon!

Despite being called Japanese Knitting, there are several crochet patterns included that have a very fresh look and interesting surface texture.  I particularly like P Vest and Stole, another two way garment that can be worn both as a long vest or as a wrap.

Many of the garments use simple shapes to make elegant silhouettes and would not be difficult to knit.  The English version helpfully includes cm to inch conversions on each pattern page for the measurements listed for that pattern.  It also includes a chart that gives you more details about the yarns used in the patterns, which are difficult to find outside of Japan, so that you can make effective substitutions.

Overall, I’m happy to be able to add this book to my collection and I hope Tuttle puts out more of these gems!

On the Needles in June

On the Needles in June

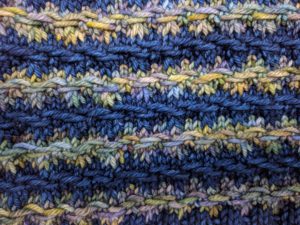
The last month has been a time of putting some projects on hold and ramping up others.  Tomorrow I’m planning to publish the sixth in my series of eight teaching packs.  This one will include a pattern for a baby sock and teach students all the basics of knitting a top down sock so they can go on to full sized socks knowing all the basic techniques.  I’ve been working on the pattern for the seventh teaching pack– an introduction to slip stitch knitting.  Look out for a new pattern for the Seetang Cowl that goes along with this pack– it has a great texture that works will with variegated yarns!

My shawl design is on hold as I wait for another skein of yarn to arrive.

So while I wait, I started on the On a Whim sweater I picked out last month.  I am making a lot of progress and am only about 25 rounds from the underarms!  Since it’s an A-line design, that means I’m probably about half way done with the knitting!

I decided to take the Featherweight Cardigan off the knitting belt and start working it in my usual continental style of knitting.  I really like the idea of a knitting belt, but putting it on and taking it off slows me down from picking this project up.  A lightweight sweater like this one is perfect for Santa Cruz weather and I want to get it done, so I’m keeping it on the same needles but using them as straight needles.  I’m not giving up on the knitting belt, but I need to find another project (perhaps in larger yarn) to work on it.  I’ve reached the underarm seams on the back piece and am starting the bind offs.

I have two pairs of socks on the needles.  The Rose City Rollers are in my purse, waiting for down time for me to start the heel flap on the second sock.  And I’ve passed the heel and am on my way up the leg on my first in a pair of Fidget Socks.