Friendship Knitting

Friendship Knitting

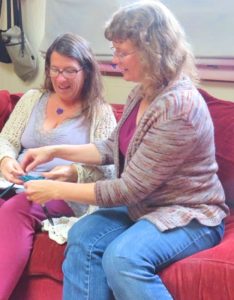
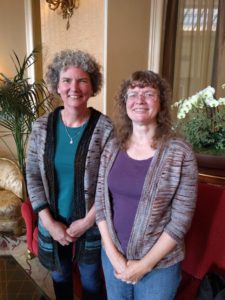
This month, my friend Jahna and I got to meet up in San Francisco.  We were wearing the sweaters we made as a friendship knit along.  This was the third project that we’ve done together as a knit along.

The first was the BFF Cowl, which is a completely great friendship project.  You each make two short scarves in different yarn and then you exchange one of them so that you have one that you knit in one color and one your friend knit in another color.  Then you graft the ends together so that they form two interconnected rings.

The second project was a Cheveron Blanket.  Being as they are big and bulky, we’ve never gotten our blankets together.

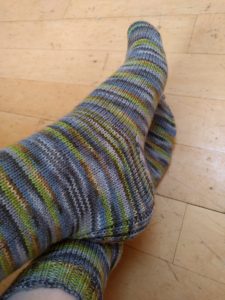
The sweaters are our most recent project.  For this one, we both picked a sweater from CustomFit, and we picked out yarn from the same indie dyer, but Jahna did hers in a worsted weight yarn and with a longer length and I knit mine in sport weight and a shorter length.  Jahna did some cool color blending on hers as well.

We haven’t decided on our next project, but we are considering a double knit Star Wars scarf!

Looking for some ideas for friendship knitting projects?  One book that we have looked at is Knit the Sky by Lea Redmond.  This book is choke full of interesting possible projects, with a few that are specific to friendship knitting.


Teaching Tips: Should I correct stitch mount?

Teaching Tips: Should I correct stitch mount?

When I’m teaching knitting classes, one thing that comes up occasionally is stitch mount.

For most English speaking knitters, the stitches on their needles have the right leg to the front and the left leg to the back as shown on the left-hand needle in this drawing (Western method knitters).  However, some knitters mount their stitches with the right leg to the back and the left leg to the front as shown on the right-hand needle in this drawing (Eastern Method knitters).  Or they might work knit stitches one way and purl stitches another way (Combination method knitters).

If one enters the stitch on the right-hand needle by trying to insert the needle to the left side of that front leg, it will twist the stitch.  Many of the knitters I’ve met who mount their stitches this way, know to enter the stitch from the right side of that front leg, so the stitch doesn’t twist.  The only problems come in when these knitters try to follow directions for certain increases and decreases that assume the stitches will be mounted with the right leg to the front.

Here’s my philosophy: there is no wrong way to knit if you get the fabric you want.  I never try to change the way an established knitter forms their stitches in my class if they are getting the fabric they want and working at a satisfying speed.  I do help them convert English directions to make increases and decreases work as the pattern expects them to work.  For a great resource on this, check out this handy chart.

On the other hand, I do encourage brand new knitters who will be using primarily English language patterns to adjust their stitch mount to fit the expected norm for those patterns– the Western method.  I explain my reasoning (simplifying reading patterns as their skills develop), but I also explain that not changing means they just have to be conscious of their desired results and when they need to diverge from the written directions.

For links to purchase my teaching packs for beginning knitting classes click here.  For a great explanation of different knitting styles and methods, check out this tutorial.  And if you aren’t familiar with knitting in a variety of methods, I highly recommend Patty Lyons’ Craftsy class called Improve Your Knitting, which includes basic instruction for a variety of styles and methods.

Crochet Water Balloons for Summer

Crochet Water Balloons for Summer

A few weeks ago a friend sent me a link to an article about crocheted water balloons.  The idea was to make a balloon shape out of Bernet Blanket yarn and then soak them in a bucket to throw instead of a traditional water balloon.  The yarn is very absorbent so they soak up a lot of water and make a pretty satisfying splat!

Advantages: reusable, machine washable, don’t leave bits of plastic all over your yarn for birds and wild animals to get, easy to “fill,” fast to make.

Disadvantages: don’t make quite the same explosive splash as a traditional water balloon and they are made of synthetic yarn so you haven’t gotten totally away from the plastic problem.

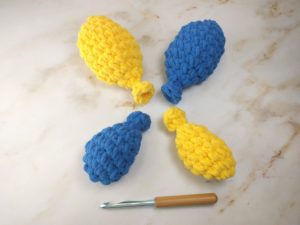
All the patterns I found online worked in rounds with a chain up instead of working in a spiral, and of course I felt many weren’t quite round enough or had enough of a balloon looking top.  Many patterns called for a magic loop start, which I think is hard in this yarn because it is so grippy.  So in the end, I designed my own pattern!

If you are local to Santa Cruz, CA, I’ll be teaching a class on how to make these at Knit Sew Make.    If not, or if you are already comfortable with crochet, here’s the pattern so you can make your own!

Materials Needed:

  • Size 9mm crochet hook (US size M)
  • Bernet Blanket Yarn (or other super bulky chenille style yarn)
  • Removable Stitch Marker

Note: Balloons are worked in a continuous spiral.  To keep track of where the rounds begin, place a removable stitch marker in the first stitch of the round and move it up after each round is completed.

Small Balloon

Round 1: Ch 2, 6 sc in second ch from the hook, do not join. (6 sts)

Round 2:  2 sc in each st around (12 sts)

Rounds 3-4: Sc 12.

Round 5: [Sc 4, sc 2 tog) twice. (10 sts)

Round 6: [Sc 3, sc 2 tog] twice. (8 sts)

Round 7: Sc 2 tog four times. (4 sts)

Round 8: Sc 4.

Round 9: [Sc 1, 2 sc in next st] twice, join to beginning of round with slip stitch. (6 sc).

Fasten off.  Use a piece of yarn to tie the neck of the balloon and push all ends to the inside of the balloon.


Large Balloon

Round 1: Ch 2, 8 sc in second ch from the hook, do not join. (8 sts)

Round 2: [Sc 1, 2 sc in next sc] four times. (12 sts)

Round 3: [Sc 2, 2 sc in the next sc] four times. (16 sts)

Round 4-7: Sc 16.

Round 8: Sc 2 tog eight times.  (8 sts)

Round 9: Sc 8.

Round 10: Sc 2 tog four times.  (4 sts)

Round 11: Sc 4.

Round 12: 2 sc in each stitch around, join to beginning of round with slip stitch. (8 sts)

Fasten off.  Use a piece of yarn to tie the neck of the balloon and push all ends to the inside of the balloon.

On the Needles in May

On the Needles in May

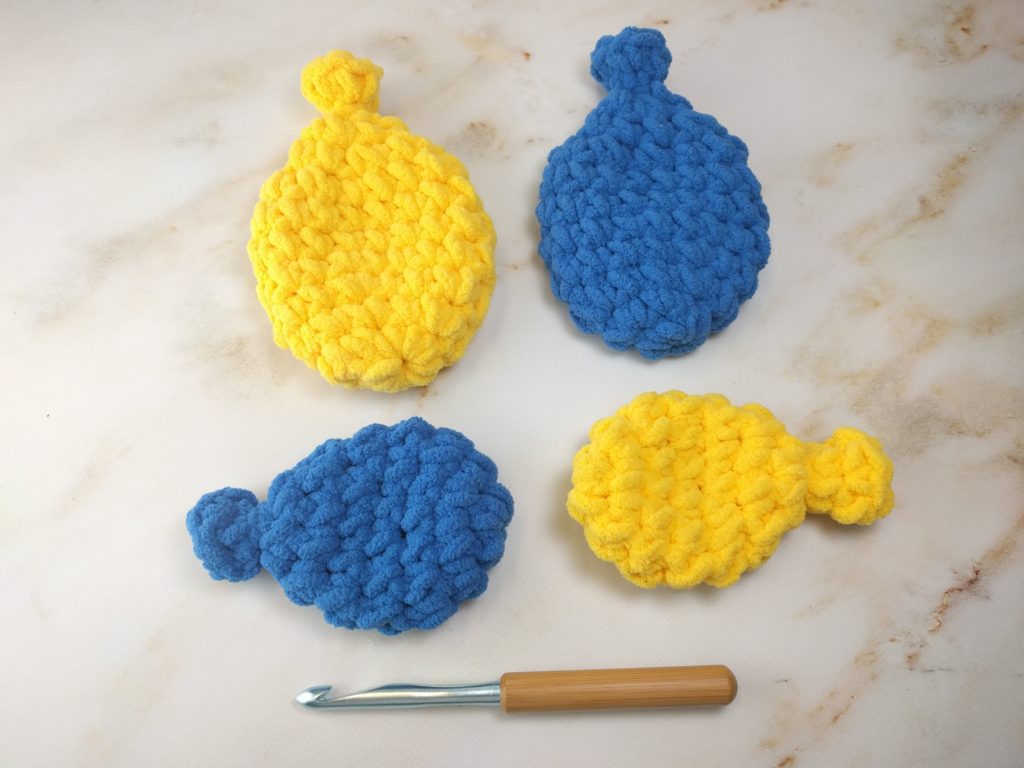
April was a month of finishing!  I completed my Wynne Shawl and the creature from Edward’s Imaginarium for my daughter.  The hair on the creature took as long as doing the arms and legs combined!  I also made two pairs of socks on my circular sock machine for a school raffle.

I continue to slowly move along on my Featherweight Cardigan.  I find that I don’t pick this up as often as I should because I’m working it on the knitting belt and the extra step of putting on the knitting belt somehow keeps it from being easy to pick up.  I’ve considered putting it on regular needles, but I’m afraid my gauge will change and also that I’ll never get good at the knitting belt technique if I bail now!  I probably need to pick a time of day to work on it and stick to a schedule.

Yarn for On a Whim sweater

I’ve also got a new sweater swatched and ready to go.  I’ll be making the On a Whim Custom Fit sweater by Amy Herzog in a fingering weight yarn I got from Expression Fiber Arts.  As you can see from the wound yarn, I’ll need to alternate skeins throughout!

I’m making steady progress on my new shawl design.  This will be more of a shawlette, but since it’s also meant to be a pattern to learn to knit lace, I think that’s going to be fine!  I’m really loving the yarn I’m working with and can’t wait to see the final results!

A friend pointed me to the idea of crocheted water balloons, so I’ve also been playing with some super bulky yarn and spinning up my own pattern for these great toys.  They don’t fill with water, but the Bernet Blanket yarn becomes really saturated so they make a very satisfying splat when they hit something (or someone).  And no scraps of balloon to hurt the animals.  And endlessly reusable!  Look for my version of the pattern in an upcoming blog post!

Prototypes for my crocheted water balloon pattern.


Knitting in Company

Knitting in Company

Last week I went to a knitting retreat that I’ve been attending for the last two years.  We meet at the St. Francis Retreat Center about an hour from my home.  The rooms are simple, the food is wholesome, and the company is great!  This retreat has a few social events such as a sock yarn exchange and a single one-hour workshop, but most of the time is listed on the schedule as “Relax.”  The center has a short walking trail around a seasonal pond and some slightly longer trails up in the hills.  A lawn with large, shady trees spreads across the front of the retreat center as well.  Just before the retreat, I had the unfortunate experience of being rear ended twice in one week, so it was great to spend a weekend not driving at all and just basking in the company of fellow knitter.

The conversation ranges from the technical (such as the best way to finish the top of a colorwork knee-high sock) to the personal (dealing with health issues) and everywhere in between.

Knitting in company is one of the best things ever.  I was part of a spirited conversation about the best interchangeable needle sets and all the considerations you might make in deciding which one to purchase for your first set.  I’m quite sure my non-knitting friends eyes would have glazed over about two minutes in!  With our hands at work, our minds are free to puzzle over both the mysteries of life and the technicalities of our craft.

I highly recommend finding a knitting group.  It doesn’t have to be a weekend retreat, a weekly or monthly group also has many of the same advantages.  Meetup.com has listings and many yarn shops have social knitting events.  Many communities have knitting guilds that have social events as well as more formal meetings.  You might even find a group at a local library.

I’m on the top row, sixth from the left.
Teaching Tips: Asking Permission

Teaching Tips: Asking Permission

One thing that I always try to do while teaching a class is to ask permission before I handle a student’s work.  This is a small thing, but my goal in class is to empower students to find and correct their own errors.  If I take their work every time a problem occurs and whisk it away for a quick fix, my students never really learn to do the things they need to do when they are on their own.

When a student asks for help, I look at the work in their hands and see if I can identify the problem and give verbal directions.  If not, I ask if I can hold their work so I can examine it more closely.  Once I’ve identified the problem, I have some choices.  I can ask the student if I can fix it for them and explain what I’m doing, or I can hand it back and direct the student verbally or using my sample to demonstrate.  I do a mix of these things in class, depending on the skill level of the individual student and what the student indicates to me that she or he needs to move forward.  I admit I may not be perfect at asking permission every time, but learners benefit from being treated as capable and in control, and asking permission is one way to achieve this goal.


Podcast Favorites

Podcast Favorites

I love listening to podcasts while I knit, and when the news gets too overwhelming, I listen to them while I drive as well.  I have quite a few I like to keep up with.  Here are some of my favorites!

This first batch of podcasts have a similar format.  They are chatty podcasts with one or two hosts who talk about what they are working on mixed with some advice and/or inspiration and some talk about their non-knitting lives.  All of these have active Ravelry groups so there is a lovely community you can join with each one.

  • The Knitmore Girls is my favorite in this category.  I love how Jasmine and Gigi, a mother-daughter team, mix in lots of advice and wisdom into their podcast.  They do a regular review section, which has enabled me more than once to get some really great books!
  • The Yarniacs were my first podcast because they came to speak at our knitting guild!  I had no idea there were even knitting podcasts before I met them.
  • Prairie Girls Knit and Spin is another favorite.  I always feel the hosts are the alter egos of me and my best friend if we were from Nebraska instead of Kansas!
  • Down Cellar Studio Podcast is a new favorite of mine– Jen lives a very different life than me, but I really enjoy her creative spirit!
  • The Two Knit Lit Chicks host a podcast that is both knitting and book reviews.  Another mother-daughter team that I really enjoy listening to!

This second batch are podcasts with more specific themes and an interview format.  These are podcasts that are more informational and keep me inspired in pursuing knitwear design.

  • Yarn Stories is a new favorite for me.  I’ve been absolutely loving hearing interviews with the many indie dyers and yarn producers and learning more about the yarns I use.
  • Tightly Spun is a new podcast that interviews everyday knitters.  It reminds me how we all have a story to tell about knitting and how it has changed our lives.  (You can find the interview that I did here.)
  • Stitchcraft Marketing focuses on interviews with people in creative industries.  It’s a great resource for anyone trying to make money in the crafting market.
  • The Sweet Georgia Show also has an interview format and goes in seasons.  She has hosted some very interesting guests.

Those are the podcasts I keep cued up right now!  What are your current favorites?


On the Needles in April

On the Needles in April

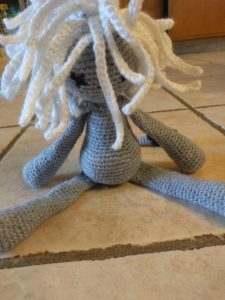
I did a lot of starting and finishing of smaller projects in March.  I made a total of five crochet mandalas, several of which are going to be on display at Knit Sew Make.  I also crocheted the Artfully Simple Angled Scarf with some yarn I purchased from Leading Men Fiber Arts.  And I finally finished my Vanilla is the New Black socks, which I am pretty pleased with!  I’ve also been working on making Knitted Knockers.  I go to a knitting retreat every April and Knitted Knockers is the chosen charity by the organizers.

I have enough yarn left over from my socks to make a pair of shortie socks, so I started the Rose City Rollers socks as a purse project.  I also needed a new pair of socks to go on my bedside table, so I’ve got a pair of Fidget Socks started as well.  This is a toe up pair, and I have to say, I find starting toe up socks more fiddly than fidgity!  I always feel I have to get eight or ten rounds in before it starts to feel comfortable!

I picked up a project that has been languishing, a creature from Edward’s Crochet Imaginarium.  I started this last year for my daughter, but was finding that it was hurting my hands to work at such a tight gauge.  I switched from my beloved, owned-since-high-school Boye hook to a padded ergonomic one from Knit Picks and things are moving right along.

I continue to make progress on my Wynne shawl and will be ready to bind off after just a dozen or so almost 500 stitch rows!  I’m using a gradient for the blue and I really want to reach the next darker color to edge the shawl before I bind off so I’m adding a few extra rows to the end.

I’m also in the planning and swatching stages for a new shawl design.  This pattern will be in fingering weight with a pattern that will gradually move from simple eyelets into more complicated lacework.  I’m envisioning it as a KAL shawl for new lace knitters or a teaching tool for classes.

Speaking of teaching tools, one thing that came off the virtual needles in the last month was a set of teaching packs.  These are sets of materials designed for busy shop owners and knitting teachers.  They have everything you need to teach a class– a reproducible pattern, class handouts, and teacher notes– all you need to do is make the sample and teach!


Crochet Mandalas

Crochet Mandalas

This week I took a break from some of my knitting projects to make a series of crochet mandalas from the book Modern Crochet Mandalas, published by Interweave Press.  These colorful creations use a variety of crochet stitches to create layered designs.  Since each round uses a repeat of stitches to create the pattern for that round, they are very meditative and restful to create.  It’s also been fun creating color combinations for each design.  I purchased eight skeins of coordinating mercerized cotton yarn to use with the book and have been surprised at how different each one appears!

The book itself is not for the beginning crocheter.  Other than the 50+ patterns, there is very little additional material.  Even the stitch glossary in the back is incomplete compared to the stitches that are actually used in the mandalas, so you are better off if you have crochet experience before using this book.  Each pattern is beautifully laid out with a large photo, complete written instructions, and a large charted version of the pattern.  I absolutely love crochet charts for ease in understanding what the written instructions will create and these are easy to read and well done.  My only complaint about the book is that each and every pattern I’ve made has contained at least one error so far.  The error is always in either the written instructions or in the chart, never in both, so if you carefully examine the photos, you can tell which direction was meant by the creator.

For a book aimed at those who are more beginners in crochet, I’d recommend Mandalas to Crochet: 30 Great Patterns by Haafner Linssen.  I purchased this at the same time and it has extensive material on how to form all the stitches needed for the designs in the book as well as some specific tricks and techniques for working in the round and getting a seamless effect.  It gives a lot of suggestions for working with color and creating mandalas with different weights of yarns.  The patterns are overall a little more simple to create than the book I’ve been working from, but still quite beautiful.

If crochet is part of your fiber arts skill set, I recommend giving crochet mandalas a try!

Teaching Tips: Developing Your Mental Library

Teaching Tips: Developing Your Mental Library

One of the key difference between teaching adults and teaching children is that adults come to class with a rich collection of prior experiences.  So when you teach knitting classes with adult learners, you have the opportunity to help the students draw out that prior experience to learn the new skills you are teaching.

Some of your students’ prior experiences will be with the fiber arts.  They may have crocheted, or embroidered, or sewed, and each of these crafts has related experiences.  For instance, crocheters usually tension the yarn with their left hand, so in beginning knitting classes, I will show crocheters how to knit Continental style rather than English style as it is usually easier for them.  Weaving in ends may make more sense if it can be related to embroidery.

Other times, prior experience is related to other fields that can be applied to knitting.  For instance, students who have experience writing computer code may find it helpful for me to show how reading a pattern is similar to reading code.

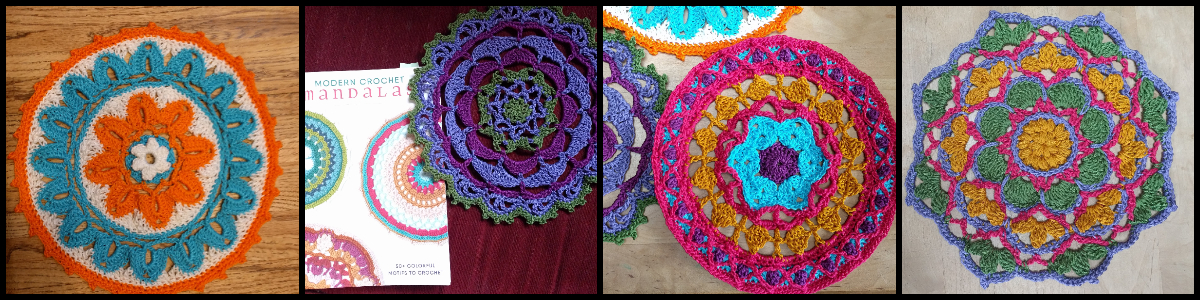
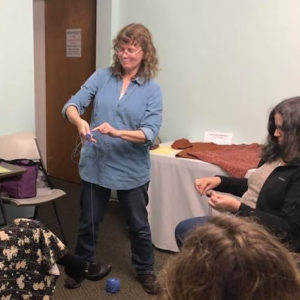
I also find that some students find more benefit to visual cues in diagrams, others find it easier to repeat a rhyme or catchphrase, and still others will learn best from mirroring my hands in motion.  These preferences are often based on prior experience or work related skills.  Because of this, I try to have at least three different ways to explain any skill in that I teach in a knitting class.  Some of these I’ve developed by listening to how one student will explain a task to another student.  Others have been gathered from watching other teachers and from reading a variety of books.  A few have been created on the fly when no other explanation seems to work for a student and I’ve had to invent a new way to explain a task.

To help me know what might work best for a given class, I always take some time for introductions and find out what related skills students may already have.  If I have a large class and don’t have time for individual introductions, I use a quick verbal survey and hand raising to get an idea of student experiences and prior knowledge.

Having a mental library of different ways to explain a skill will help all your students to be successful.  Note that your mental library may include tricks and techniques that would not be useful at all to you as a learner, but they may be useful to one of your students.  Becoming a successful teacher is in part developing the ability to teach those who learn in different ways.