Making Mitts on the CSM

Making Mitts on the CSM

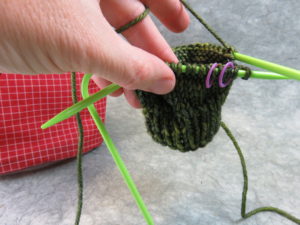
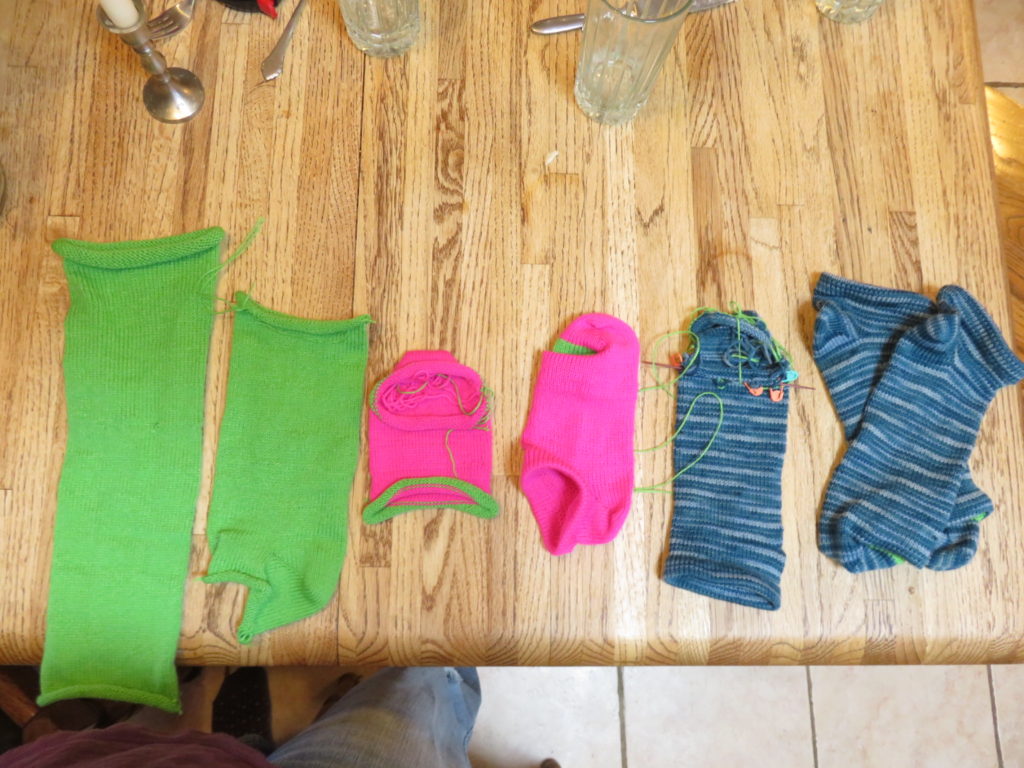
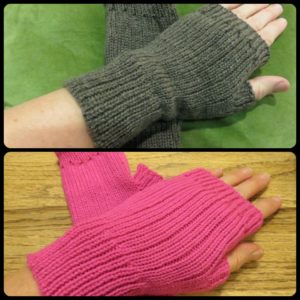
So far I’ve made two sets of mitts on my circular sock machine and they are quickly becoming my favorite project. There are no heels to turn and they are smaller than a sock so there is less cranking.  I make a hole for the thumb using this technique and do a bit of hand work to finish them with a hand knit thumb which is a comfortable thing for me to do as a hand knitter.  They have also taught me a lot about using my ribber.

You can take a look at the checklist I developed to make these mitts.  I’ve been using checklists like this for my projects because they help me remember to do all the steps for both items in a pair, and if I’m pulled away from the machine by family needs, I know where I am when I can return.

Since the mitts are ribbed from top to bottom and require starting with the ribber and then changing to less ribber needles and then back to more ribber needles, I had to really get more comfortable with my ribber.  In no particular order, here are some things that helped me:

  1. Slow down!  Stockinette on all cylinder needles pretty much behaves itself at all speeds as long as your tension is right and the yarn is feeding correctly.  At least on my machine, when the ribber and cylinder needles start working together, I need to slow down so the yarn feeds back and forth between those needles evenly.
  2. Watch the first round or two carefully after switching needle formations.  In addition to going more slowly, I carefully watched each needle close around the yarn after putting in the new needles.  Although I carefully check the latches to make sure they are open, by watching each needle, I can make sure each one is going to do its job and I didn’t accidentally brush a latch closed somewhere.
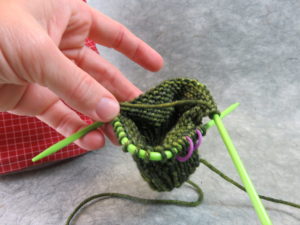
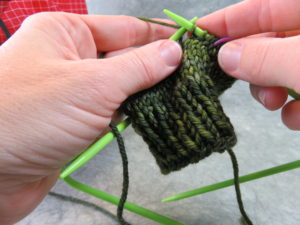
  3. Learn to do the needle transfers from cylinder to ribber as shown here.  At first I was using a pick tool to move the stitches and it stretches them out just enough that they were more prone to dropping.  This method leaves the stitch tight on the new needle.
  4. Watch the latches carefully when switching to and from waste yarn.  The other place I would drop stitches was when moving between waste yarn and project yarn because the knot would get in the way of a needle latch or the long tail pulled into the cylinder would change the angle of the yarn.  So I’ve learned to watch those areas carefully and help the yarn into a latch if it misses.

(Some of the links in this post are to Ravelry forums.  If you are working with a circular sock machine, there are several friendly and helpful groups on Ravelry– and joining Ravelry is free!)

Favorite Sock Knitting Books

Favorite Sock Knitting Books

Last weekend I taught a class on learning to knit socks. One of the things I love about socks is how they are so easy to customize and that even a plain sock can be interesting to knit. I gave my students a list of favorite sock knitting books, so I thought I would share them here as will with some additional annotations.

(Note: all links are affiliate links and if you purchase the book through that link, I’ll get a few cents at no extra cost to you!)

Knitting Rules! by Stephanie Pearl-McPhee

This is not strictly a sock book but rather a book of  humor and recipes for knitting a variety of items including a great chapter on knitting basic top down socks.  What I love about it is the conversational style that Stephanie uses to describe the process of making a sock and how she shows that you can’t really do it too wrong.  I’ve tried to model my class a bit after her style– that socks are something that can make sense and everyone can do it!

Custom Socks: Knit to Fit Your Feet by Kate Atherley

This book is sort of the opposite in some ways to the previous book.  It’s a very detailed and precise explanation of exactly how to make a perfect fitting sock with tables and charts for knitting both top down and bottom up socks with measurements and stitch counts ready for you to plug into a master pattern based on your gauge. It includes some variations on heels, toes, and leg styles and has extensive information about how to make a sock for all kinds of special fitting situations.  Kate has a very scientific approach to sock making.

The Sock Knitter’s Workshop by Ewa Jostes and Stephanie van der Linden

This book is a compendium of a wide variety of heels and toes and construction methods.  It contains a collection of charts with numbers for different sock sizes from children to adults in a standard sock gauge.  You can mix and match your favorite heels and toes with the standardized numbers included.  It also information to help you decide which methods to use based on the shape of your foot.

Sock Architecture by Lara Neel

Similar to The Sock Knitter’s Workshop, Lara’s book describes a wide variety of toe and heel variations, including some that are not part of the book above.  Lara’s book does not give as much information about sizing and construction, but is a great resource for exploring new methods.

Free Simple Mug Rug Pattern Released This Week

Free Simple Mug Rug Pattern Released This Week

This week, I released a free pattern for a very simple mug rug— a square coaster to go under your tea or coffee mug.  This pattern was designed for beginning knitters as a first project to learn the knit and purl stitch and make a useful object at the same time, but it’s also a great quick knit for more experienced knitters for gifts or craft fairs.

And it goes great with my Coffee Cup Cozy pattern!

I hope  you enjoy this free pattern!

Slip stitch knitting

Slip stitch knitting

I’ve been enjoying experimenting with slip stitch knitting, which I find a very approachable and relaxing way to do colorwork.

I first read about slip stitch knitting in A Treasury of Knitting Patterns and A Second Treasury of Knitting Patterns.  Many of the patterns are mosaic knitting which forms a pattern of knit stitches on the outside of the garment and all the slipped stitches are on the back of the work.  My first real exposure to actually trying slip stitch colorwork was in a workshop by Patty Lyons at the 2015 Knit and Crochet show.

Many slipped stitched patterns, like the common linen stitch, use a single slipped stitch with the yarn in front to make a textured fabric.  This fabric is fairly inelastic and dense.  Although this sample is in a solid yarn, linen stitch does some amazing things to break up variegated yarn.

Mosaic knitting and some other slipped stitch patterns use slipped stitches to somewhat emulate the look of fair isle knitting, where all the yarn floats across the slipped stitches are on the back of the work, so all you see is the knits.

My favorite slipped stitch patterns are those that use the yarn floats on the front of the work as a design element.  I love the way those yarn floats are raised slightly from the rest of the knitting and how you can stagger them to create an effect, like in this swatch from my free pattern, the Aurora Cowl.

My current favorite resource for slipped stitch knitting is The Art of Slip Stitch Knitting.  This book explores several different styles of slip stitch knitting and has projects to go with each one.  It’s part designer’s guide to using the stitches, part stitch dictionary, and part pattern book.

(Note: Links to Amazon are affiliate links, I’ll get a few cents if you purchase through those links.)

Playing with Curved DPNs

Playing with Curved DPNs

I recently purchased some curved DPNs and for my first project I made a couple of pairs of fingerless mitts from a pattern by Clara Parkes in her Craftsy class, Stashbusting (it appears to be very similar to this pattern on Ravelry).  I purchased the Neko Strickespiel curved DPNs from Candra’s Yarn Paradise on Etsy.

Basically, they are a set of three bent DPNs made from a slightly flexible plastic.  Each of two needles has about half the stitches on it and you curve the waiting stitches around one needle while you push together the ready to work stitches on the other needle so that you have the triangle shape you would get working with three traditional, straight DPNs.

Advantages:  I liked working with them because there are only two needle changes per round, similar to working with a magic loop, but without the extra cables hanging out.  I like using magic loop, but with small objects like mitts or socks I often feel like I have more needles and cables than yarn in action!  I felt like my rounds went faster than when I use a regular DPN set or magic loop.  There were less pointy things sticking out than with straight DPNs, which made working on a small object seem easier.

Disadvantages: The needles have some gaps on the small end of sizes, missing some of the US sizes that are listed in patterns.  I also had trouble with laddering where the two needles met in my work.  I don’t usually have trouble with laddering on straight DPNs.  Because of their shape, the trick of moving the location of your needles as you work was not easy to do.  I found that if I tugged on both the first and second stitch each time I rotated to a new needle, the laddering disappeared for me.

Tricky bits: I watched this video on the Neko page to help me figure out how to hold the needles.  With straight DPNs, I usually rotate the needle I’m working stitches off of to be on top of the other needles with a little under/over flip of orientation as I start each needle.  With the Neko’s, I found that working one needle on top of the other two ends and one needle under the other two ends was the best strategy for fast changes between needles.

Pushing the stitches forward onto the tip of the working needle.
Ready to knit the next round.
Knitting off the next needle.
Introducing the Aurora Cowl

Introducing the Aurora Cowl

The Auro
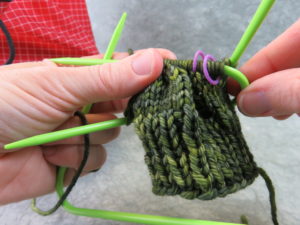
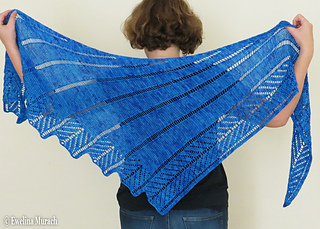
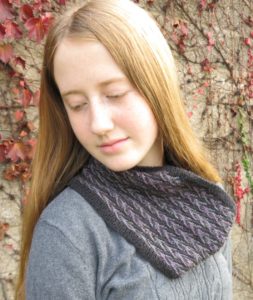
ra Cowl was published today in the free online magazine Knotions.  Aurora is a luxuriously soft cowl made with Malabrigo Mora, a 100% silk fingering weight yarn.  It’s also a surprisingly simply knit. An easy to follow slipped stitch pattern in a color changing yarn across a solid background creates the impression of of arcs of color reminiscent of the Northern Lights.

Slip stitch patterns are one of the simplest forms of colorwork to learn because in each row or round, the knitter only works with one color of yarn.  As you can see, though, you can create surprisingly complex patterns.  Both written and charted instructions are available for the Aurora Cowl.  This pattern is great for combining a solid yarn with a fast or slow color changing yarn.

The sample uses two skeins of Malabrigo Yarn Mora, one each in Black and Zarzamora.

First Adventures with a Hand Crank Circular Sock Machine

First Adventures with a Hand Crank Circular Sock Machine

As a combination Christmas/birthday present last week, my dear mother in law gave me an Erlbacher Gearhart Circular Sock Machine.  My machine is a Speedster, named so because it has a 1:1 gear ratio– one turn of the handle equals one turn of the carriage.

I started my adventures setting up the machine and doing lots of tubes and sample heels.

After I got comfortable with cranking out tubes and making heels and toes, I tried my first pair of socks.  I picked the simplest pattern possible– a 
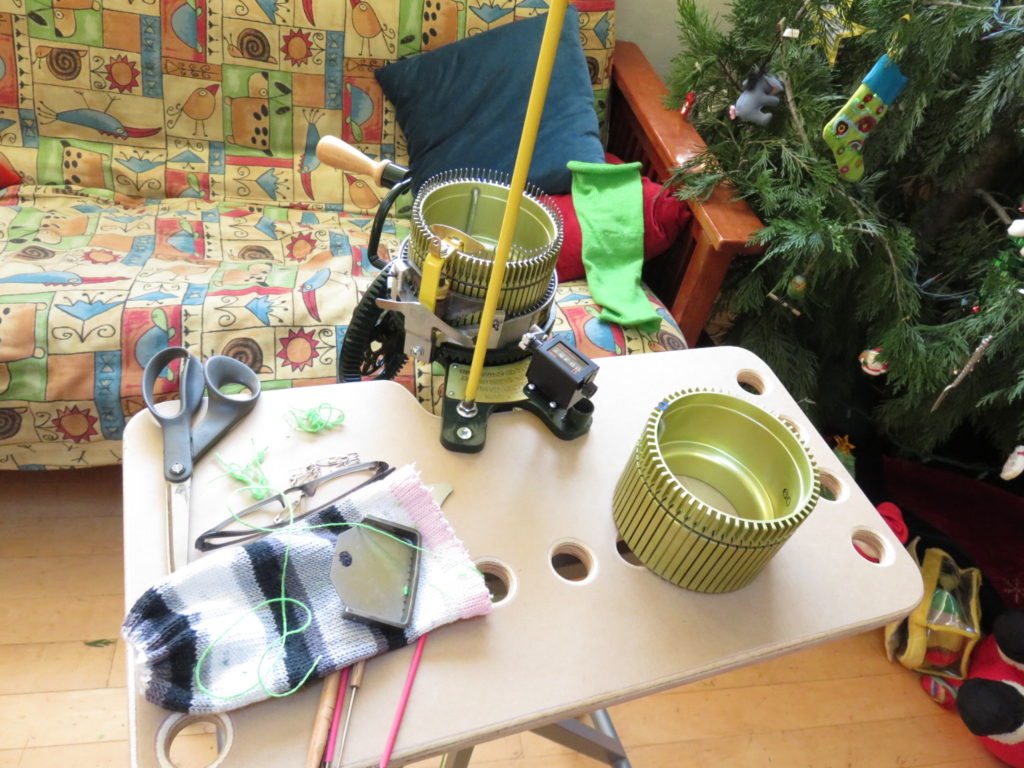
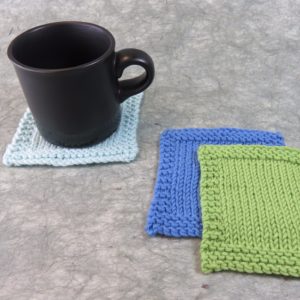
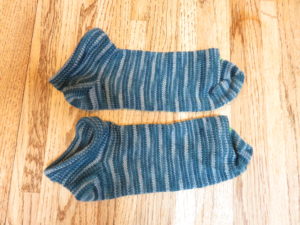
shortie sock with no ribbing.  I used the socklet recipe given by Jocelyn in her fiberdev blog.  I used this video to learn how to make the hung hem and I used the manual that came with my machine and this video to make a quick and easy heel.  This video is a demonstration of this type of sock and it was really useful to watch although not meant as an instructional video.  Finally, this video helped me to Kitchener stitch the toes.

You can see more details for this sock on my Ravelry page.  These socks are loose around the ankles but comfortable in the foot.  I made them a little too long for my foot.


Next, I decided to make friends with my ribber.  For the most part, I used
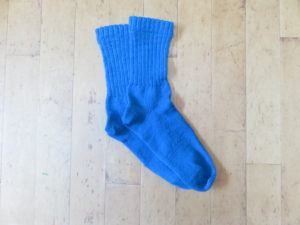
 this video by Jenny Deters and followed it step by step.  I also watched the Erlbacher Gearhart videos specifically about using my ribber to get started.  I dropped a couple of stitches for a couple of rounds on one sock and didn’t notice till they had already repaired themselves, so I caught them with a safety pin and made a repair after the sock was off the machine.

This sock has ribbing on the top of the foot but is stockinette on the sole and it’s fully ribbed around the leg.  It fits really well and is surprisingly comfortable in a shoe.  I made these just a tad short.  You can see more details on my Ravelry project page.


My third pair of socks allowed me to try the final techniques I was interested in learning right away– toe up socks and mock rib stitch.  I used this video and this video to make the toe and then used the heel I’ve been using for the other projects.  I used this video to make the mock rib and this video to finish the hem.

These socks fit well in the foot (I finally found my magic number for rounds in the foot) and the mock rib held the socks up surprisingly well.  You can see my recipe for this sock on my Ravelry project page.

Learning to use a circular sock machine requires some detective work.  The manual that came with the machine has lots of the basics, but some things are better explained in the company’s videos and in videos by other “crankers”.  I found some great support in the Erlbacher Gearhart Ravelry Group, which is quite active, and also in the Circular Sock Machine Knitters 2.0 Facebook group.  I also started a Google Doc where I’ve been collecting names of methods with informational links as well hints and tips that seem useful.  There are a few things that I’ve read about but haven’t found a good explanation for yet.  You can see that document in view only format here— I’ll be adding to it and reorganizing it as I continue to learn.

Caught My Eye: Indie shawl designs from the GAL

Caught My Eye: Indie shawl designs from the GAL

I’ve been thinking about starting a new series here of some designs that have caught my eye as a browse Ravelry or pick up new (and old) magazines.  These are designs that I might never knit, so I’m not sure I can say I’m “stalking” them as many knitters describe this window shopping experience, but they have elements that I find interesting or attractive.

For my first installment, I want to share some of the shawl patterns by other designers that caught my eye in the Indie Design Gift-a-Long.  These are patterns by new to me designers.

Dreamcatcher is a bias knit shawl by Ewelina Murach which caught my eye because of the diagonal lines of yarn overs, almost rays, coming from one corner of the shawl.  I love how there is some lace texture at the end of each ray that really comes into focus when the shawl is wrapped around the model’s neck!


Oolong by Georgie Nicolson was another shawl that jumped out at me.  I love the cream color yarn with the highly textured stitches on the border.  It looks elegant and warm.  (It might help that one of the stitch motifs is one that I just spent the last couple of weeks knitting for an upcoming design!)


Finally, Maribou, a cabled shawl by Kino Knits, was my third pick.  This shawl has a lovely pattern of cable crossings that each end with a shaped point so that they look like feathers.  The center spine on this rectangular shawl also evokes the sense of wings.  I really enjoyed reading the backstory of the inspiration for the shawl.


All these patterns are part of the GAL and are 25% off through Nov. 30, 2016 with the giftalong2016 coupon code!

Indie Design Gift-a-Long Begins

Indie Design Gift-a-Long Begins

gifalong-main-ballFor the past several years, a group of amazing indie designers have been hosting a sale/GAL/CAL to support independent designers on Ravelry.  Over three hundred designers are participating this year and there are literally thousands of patterns to choose from, including six of mine!  All participating patterns are 25% off through Nov. 30th and then the knit/crochet-a-long runs through the end of the year.

There are several ways you can view all the patterns.  One thread in the group includes sample pictures like this one of mine for each of the designers that give you a taste of what the designer has in her shop.  indie-designer-gal-collage-500You can click on a link to get to the designer’s shop and see all the sale patterns in a bundle.

If you have Pinterest, you can look at all the available patterns through the boards that have been set up there by category (those categories are also the categories for the KAL/CAL).

There are literally hundreds of prizes for the GAL portion and even a special prize for someone who completes one project from each category.

So, go check it out for some great deals and support indie designers this holiday season!